

Self Lace a Corset for Beginners: Bunny Ears and 5 to 10 Yards
Use standard criss-cross lacing with “bunny ears” at the waist, and choose strong, non-slip laces over decorative ribbon. This combination lets you self-lace safely, tighten evenly, and adjust the fit without a second pair of hands. For most corsets, waxed cotton or braided synthetic lacing in the 5 to 10 yard range covers you, depending on whether it’s an underbust or overbust style. One rule overrides everything else: never wrap loose lace around your body to finish it off.
TL;DR:
- Using waxed cotton or braided synthetic laces between 5 and 10 yards ensures better grip, longevity, and easier self-lacing compared to satin ribbon.
- Creating bunny ears at the waist helps concentrate tension, making even tightening possible and reducing the risk of uneven gaps or pinching.
- Properly anchoring lace at the center back before building a criss-cross pattern is essential for a balanced and comfortable fit.
- Tightening from both ends toward the waist with the bunny ear loops distributes tension evenly, preventing puckering or discomfort.
- For easier daily wear, styles with front busks or zippers reduce lacing steps, but the lacing technique remains crucial for comfort and silhouette.
Table of Contents
- How to lace a corset: step-by-step for beginners
- Materials and choosing the right lace length
- Putting the corset on and tightening safely
- Common corset lacing problems and how to fix them
- How Lingerie Seduction’s corsets work with these lacing methods
- Getting comfortable with corsetry takes patience, not force
- Shop corsets built for confident self-lacing
- Sources
- FAQ
How to lace a corset: step-by-step for beginners
Lacing a corset is a sequence, not a single pull. Get the order right and the rest of the fit falls into place. Rush it, and you’ll end up with a lopsided gap, a pinching rib, or laces that won’t hold.
1. Check the setup before you thread anything
Look at the modesty panel first (the strip of fabric behind the lacing that stops skin showing through the gap). It should sit flat and centred. If the corset has been worn before, loosen the existing lacing right out, working from the waist toward both ends, so you’re not fighting old tension when you start fresh.
2. Find your starting point
Most corsets lace from the centre back, working outward, though some styles start at the top or bottom grommet and work down or up in a continuous line. Whichever method your corset uses, feed the lace through the centre two grommets first (usually at or near the waist) so both ends come out even. This is the anchor point everything else is measured against.
3. Build the criss-cross pattern
From your centre point, cross the laces into an X pattern and thread them through the next grommet pair, working toward the top and bottom simultaneously if you’re using two lengths of lace, or completing one direction before the other if you’re using one continuous length. Keep the X’s snug but not tight as you go. The real tightening happens later.
4. Form the bunny ears at the waist
This is the step most beginners skip, and it’s the one that makes self-lacing possible. Instead of crossing straight through the waist grommets, leave a loop of slack on each side, big enough to grab with a fist. These loops are your bunny ears. They concentrate tension where the waist is strongest, turning two floppy lace ends into a pair of handles you can actually pull.
5. Finish threading to the top and bottom
Continue the criss-cross pattern from the waist out to the final grommets at the top and bottom edges. Tie off both ends temporarily, or leave enough length to work with if you’re planning to adjust fit before committing to a bow.
6. Tighten from both ends toward the waist
Grab the bunny ear loops and pull. Then work any remaining slack toward the waist from both directions: top down, and bottom up. This distributes tension evenly instead of yanking on a single row and creating a pucker. Fine-tune individual X’s afterward if one section feels looser than its neighbours.
7. Check your fit before you tie off
Run your hand down the back gap. It should be roughly parallel top to bottom, not wider at the top or bottom than the middle. Pressure should feel even across your ribs and hips, and you should be able to take a full breath without straining. If any of that feels wrong, loosen and redo the tightening pass before finishing your bow.
Pro Tip: Experienced corset wearers often lace down with one length of lace, then come back up with the other to finish the X pattern. It halves the arm movement and speeds up the whole process once you’ve done it a few times.
Materials and choosing the right lace length
The lace itself matters almost as much as the technique. Thin, slippery cord undoes your good lacing work within an hour of wear.
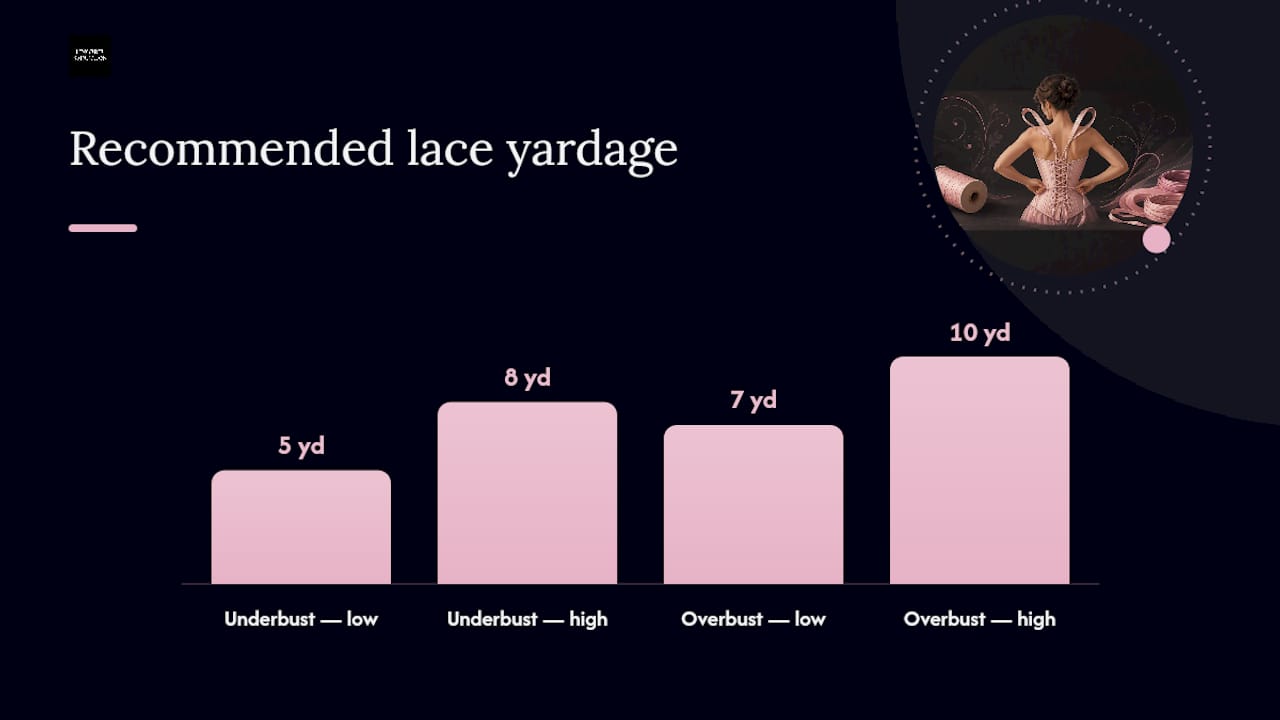
Yardage guidelines:
- Underbust corsets: 5 to 8 yards of lacing
- Overbust corsets: 7 to 10 yards, since there’s more panel length and usually more grommet pairs to cover
- Higher grommet counts and larger reductions push you toward the top of each range
In numbers: Underbust corsets typically need 5 to 8 yards of lacing, while overbust styles need 7 to 10 yards, largely because grommet count and panel length scale up together.
On material, waxed cotton or braided synthetic laces are the standard for grip and longevity. The wax coating and the braid texture both grip the grommet edges, so your bunny ears stay put once you’ve pulled them tight. Satin ribbon looks pretty in photos, but it slips under tension and frays at the edges within a few wears, which is why it belongs to short-term or decorative use rather than daily wear.
If you’re buying replacement laces, count your grommet pairs first. Each pair needs roughly the width of the corset panel in lace, doubled for the criss-cross, plus extra for the bunny ear loops and a bow. When in doubt, buy slightly long. Excess is easy to trim, but a lace that’s a foot short at the top grommet is a wasted purchase.
Finishing matters too. Cut the ends at a 45-degree angle and singe them lightly, or slip on a heat-shrink tube, to stop the fibres unravelling. If you’re working with ribbon, test the singeing on a scrap piece first. Synthetic ribbon can melt into a tacky blob if you hold the flame too close, and that’s not a fix, it’s a new problem.
Putting the corset on and tightening safely
Getting into a corset is a different sequence from lacing it flat on a table, and the order you follow here affects both comfort and how long the piece lasts.
- Fasten the busk first. The busk is the row of hooks and loops down the front centre panel. Start at the bottom and work up, and for extra security, position one busk loop slightly behind the other rather than flush against it when you clip it closed. That small offset stops the busk popping open under movement.
- Leave a generous gap for the first fitting. Before you even put the corset on, loosen the back lacing to a gap of 3 to 5 inches or more, especially with closed-front, busk-style corsets that don’t stretch open the way a zip front can.
- Put it on, then pull the bunny ears first. Once the busk is fastened and the corset is sitting in place, reach back (or ask someone to help) and pull the waist loops firm. This locks in the strongest point of tension before you touch anything else.
- Work the slack top and bottom. With the waist secured, redistribute the remaining slack from the top down and the bottom up, the same pattern you used when lacing flat, just now with the corset on your body.
- Fine-tune and tie off. Check the back gap is even, breathe deeply to confirm you’re not restricted, then finish your bow.
If you’re lacing alone and can’t get enough leverage on the bunny ears, the door-handle trick solves it. Loop the bunny ear loops over a sturdy door handle, lean your body weight away from the door, and let gravity do the pulling instead of relying on arm strength alone. It’s a genuine practitioner shortcut, not a gimmick, and it works because you’re using your whole body rather than just your hands and forearms.
Pro Tip: If a friend or partner is lacing you in, have them tighten in short stages, pulling through two or three grommets at a time rather than yanking the full length in one go. It stops the lace twisting and gives you both a chance to check comfort as you go.
For a first wear, treat the corset gently. A modest gap during this seasoning phase lets the fabric and boning conform to your shape gradually, rather than forcing a tight fit on day one. Tighten incrementally over several wears instead of chasing your smallest measurement straight away.
Common corset lacing problems and how to fix them
Even with good technique, corsets throw up small issues, especially in the first few wears. Most have quick fixes.
- Uneven gap top to bottom: Loosen the whole lacing slightly, then pull slack specifically into the bunny ears before redoing the top and bottom sections. A gap that’s wider at the top usually means the lower X’s need tightening individually, not the whole lace redone.
- Laces keep slipping loose: This is almost always a material problem. Switch to waxed cotton or a braided synthetic, and re-singe or re-tip any fraying ends so the lace doesn’t catch and slip through the grommets.
- Fabric puckering or grommets straining: Loosen immediately. Puckering usually means one section is overtightened relative to its neighbours. Re-seat the modesty panel and redistribute tension evenly before tightening again.
- General discomfort that doesn’t ease after a few minutes: Loosen the lacing rather than pushing through it. Corsets should feel snug and supportive, not sharply painful.
Three safety rules apply regardless of style or brand. Never wrap loose lace around your torso to take up slack. It’s not what the loops are for, and it can create dangerous pressure points. You should always be able to take a full, comfortable breath while laced. And if you feel dizzy, nauseous, or in genuine pain rather than simple tightness, loosen the corset and take it off. No silhouette is worth ignoring your body’s signals.
How Lingerie Seduction’s corsets work with these lacing methods
Every technique above applies directly to the corsets in the Corsets & Bustiers range, but a few product features change how easy or fast the lacing process feels day to day.
- Front busk closures, like those on the Luxury Bridal Satin & Lace Underwire Corset, let you fasten the front independently of the back laces, so you can leave the back lacing loosely set and simply adjust the bunny ears each time you wear it.
- Zip front designs skip the busk step entirely, which suits anyone who wants a faster daily routine without compromising the criss-cross support underneath.
- Underwire and boned panels, as seen on the Delicate Underwire Lace White Bridal Corset, hold their shape through the seasoning phase, so your first few wears feel more predictable while the fabric settles.
- Wider grommet spacing on some styles means fewer X’s to manage, a genuine advantage if you’re new to self-lacing and want fewer steps to get right.
The corsets in the collection are selected for quality fabrics and flattering construction, with free shipping on larger orders and hassle-free returns offered to support customer satisfaction. Before you buy, check the individual product page for grommet count and suggested lace length. It saves a guessing game once your order arrives, and it means the lacing steps above translate straight onto the piece you’ve chosen.
Getting comfortable with corsetry takes patience, not force
Correct lacing does more for comfort than any amount of tightening ever will. A corset laced evenly, with tension spread properly from the bunny ears out to the top and bottom, sits better on the body and holds its silhouette without digging in anywhere. Tightening it unevenly, or rushing to your smallest measurement in one sitting, tends to create the exact discomfort people blame on corsets generally.
Give a new corset a handful of gentle wears before judging the fit. Your body and the fabric are both adjusting to each other. If sizing or fit still feels off after that, reach out to Lingerie Seduction’s customer support or check the sizing notes on the product pages before assuming the piece itself is wrong for you. Good corsetry is a conversation between the garment and the wearer, not a battle.
— Lingerie Seduction
Shop corsets built for confident self-lacing
The store offers corset styles designed around the lacing methods covered here, ensuring the instructions apply directly to the products.

The Delicate Sheer Black Lace Corset Lingerie Set suits everyday wear and first-time corset owners, with sheer lace panelling that keeps the piece light while the boning still gives structure worth lacing properly. For a statement piece with more visual weight, the Luxe Black & Nude Lace Corset Lingerie pairs contrasting tones with the same criss-cross construction, so the bunny ears method applies without any adjustment. If ease of wear matters more than adjustability, the Shimmer Black Lace Zip Front Corset Set swaps the busk for a zip front, cutting your donning routine down to seconds while keeping the back lacing for fine-tuning fit.
Before you buy, measure yourself against the size chart on each product page, decide whether a busk or zip front suits how quickly you need to get dressed, and think about whether you’ll want to swap the supplied laces for waxed cotton over time. Browse the full Corsets & Bustiers range, or check the Lingerie Sets and Bridal Lingerie collections if you’re building a full look. Orders over $100 ship free, and every piece comes with 30 day hassle-free returns, so getting the fit right doesn’t mean getting it right on the first try.
Sources
- How to Lace a Corset: V Method + Bunny Ears
- How to Lace Up a Corset (For Beginners)
- How to Lace a Corset Perfectly for Comfort & Fit | Anarchy Label
FAQ
How do you properly lace a corset?
Thread the lace through the centre back grommets first, then work outward in a criss-cross pattern, leaving loops (bunny ears) at the waist. Pull those loops first to set tension, then even out slack from the top and bottom edges toward the waist.
What should I use to lace a corset?
Waxed cotton or braided synthetic lacing works best because it grips the grommets and resists slipping under tension, unlike satin ribbon, which tends to loosen and fray. For yardage, underbust corsets generally need 5 to 8 yards, while overbust corsets need 7 to 10 yards.
Do you lace a corset dress up or down?
Most corsets lace from the centre back outward toward the top and bottom edges, rather than strictly up or down. Some wearers prefer lacing down with one length and back up with the other to reduce arm fatigue, but the direction matters less than keeping tension even across both sides.
What are the laces on a corset called?
They’re simply called corset laces or corset lacing, and the loops formed at the waist for tightening are known as bunny ears. On the front closure, the row of hooks and loops is called the busk, which is separate from the back lacing entirely.


