


Fix Quad Boob in Two Minutes: Scoop and Swoop for Women
Scoop all your breast tissue into the cup, fasten your bra on the loosest hook, then try the same style one cup size up while keeping your current band. That single move resolves most cases of quad boob because the real problem is almost always cup volume, not your body. If overflow persists after that, the cause is likely band compression or a cup shape that sits too low, and the fixes below sort out both.
TL;DR:
- Increasing your cup size by one while keeping the same band often eliminates most cases of quad boob caused by insufficient cup volume.
- The primary cause of overflow is usually either a shoulder or low neckline, a tight band, or an underwire that doesn’t match your breast root width, not your body shape.
- Proper scoop-and-swoop adjustment before evaluating fit helps distinguish between real size issues and positioning or tissue siting problems.
- Bra styles with full coverage, seamed cups, or wider wires effectively contain fuller tissue and prevent spilling for rounded, natural contours.
- Tightening straps to fix overflow often worsens the problem; support and shape primarily depend on correct band and cup fit before strap adjustments.
Table of Contents
- What causes quad boob in the first place?
- What quick fixes should I try first?
- How do I measure my fit and use sister sizes correctly?
- Which bra styles and constructions actually fix quad boob?
- How do I do the scoop-and-swoop properly?
- When should I replace or alter a bra instead?
- Why trust Lingerie Seduction on bra fit?
- How do you adjust bra straps without making spillage worse?
- Can bra inserts or padding help minimise the look of quad boob?
- What clothing choices help hide quad boob while you sort your bra?
- What the fitting industry gets wrong about quad boob
- Bra options worth trying once your fit is sorted
- Sources
- FAQ
What causes quad boob in the first place?
Quad boob happens when breast tissue spills over or around the cup, creating the look of four separate mounds instead of two. It’s a fit problem, not a body flaw, and it usually comes down to one or more mechanical issues with the bra itself.
- Cup too small or too shallow. The cup can’t hold the full volume of tissue, so it pushes outward or upward.
- Low cup neckline. When the top edge of the cup sits below where your breast tissue actually starts, tissue simply overflows above it.
- Band too tight. A tight band compresses tissue and forces it upward and outward, over and around the cup edge.
- Underwire too narrow. If the wire frame doesn’t match your root width, tissue spills to the side, near the armpit.
- Positioning or wear. Tissue that hasn’t been properly seated in the cup, or a bra that’s stretched out from age, will cause the same effect even in the “right” size.
Many women have more than one of these happening at once, which is why a single fix, like just tightening the straps, rarely solves it on its own.
What quick fixes should I try first?
Work through these in order. Each one isolates a different variable, so you’ll know exactly what’s causing the spillover before you spend money on new bras.
- Scoop and swoop first, always. Before judging any bra’s fit, reach into the cup, gather tissue from the side and back, and settle it fully into the cup. A bra that looks wrong on first fasten often looks completely different once tissue is properly seated.
- Go up one cup size, same band. This isolates cup volume as the variable. If the overflow disappears, volume was the issue all along, not your band size.
- Try fuller coverage if overflow sits high. Overflow near the strap or armpit usually means the neckline is too low. A fuller-coverage or higher-cut cup solves this without changing your band size at all.
- Test sister sizing if the band feels tight. Go up a band and down a cup to keep similar volume with less compression. A bra extender works as a temporary test before you commit to buying.
Pro Tip: Change only one variable at a time. If you swap both band and cup in the same fitting session, you won’t know which change actually fixed the problem, and you’ll end up guessing again next time you shop.
How do I measure my fit and use sister sizes correctly?
Two simple checks tell you almost everything about whether your current bra is working against you.
- Two-finger rule. You should be able to slide two fingers under the back band, snugly but comfortably. If you can’t, the band is too tight and pushing tissue upward, which is one of the most common quad boob triggers.
- Wire seat check. The underwire should rest flat against your ribcage in the inframammary fold, the crease under your breast, not on breast tissue itself. If the wire sits on tissue rather than under it, the frame is wrong for your shape.
- Always start on the loosest hook. A new bra should fasten comfortably on the loosest of the three hooks, giving you room to tighten as the band stretches with wear.
Sister sizing swaps a band size for a cup size in the opposite direction, so a 12C and a 10D hold roughly the same cup volume with different band tension. Go up one band size and down one cup size if your band feels tight but cup volume seems right, then retest with the scoop-and-swoop method and check for overflow while raising your arms or leaning forward. If the new band feels loose instead, you’ve gone one size too far, so try an intermediate size if your retailer stocks it.
Which bra styles and constructions actually fix quad boob?
Some constructions are built to handle fuller volume and prevent tissue from escaping the cup. Others make the problem noticeably worse, no matter how well you fasten them.
- Full-coverage and seamed cups. These offer a higher neckline and more depth than moulded styles, giving tissue somewhere to sit instead of somewhere to escape. Seamed construction also lets manufacturers shape the cup around natural breast contours rather than forcing a single curve.
- Balconette styles with side support. A good balconette lifts and centres tissue with wide side panels, giving projection without cutting a hard line across the breast.
- Avoid extreme plunges and shallow moulded cups. These styles are cut low by design, which is exactly what causes top overflow in women prone to quad boob.
- Look for wider underwires and side-smoothing panels. A wider wire frame accommodates more root width before tissue spills toward the armpit.
Browsing different bra styles side by side makes it much easier to spot which construction actually matches your shape, rather than guessing from a hanger.
How do I do the scoop-and-swoop properly?
This routine takes under a minute once you’ve done it a few times, and it should happen every single time you put on a bra, not just when something feels off.
- Fasten the band on the loosest hook, checking that the centre gore sits flat against your sternum.
- Lean forward slightly and reach into each cup, scooping tissue from the side and back of your body into the cup itself.
- Stand upright and settle the tissue by shifting your shoulders, letting gravity finish the job.
- Adjust your straps only after the band and cup are doing their job. Straps should support comfort, not carry the weight.
- Test with movement: raise your arms overhead, walk a few steps, then sit down. If overflow appears only during movement, the style may be borderline for your shape rather than genuinely too small.
Pro Tip: Fitters warn that tightening straps to fix overflow usually backfires because it pulls the cup frame deeper into tissue instead of holding it. Fix the cup and band first, straps last.
When should I replace or alter a bra instead?
Not every quad boob problem is fixable with adjustment. A few signs tell you it’s time to retire a bra rather than keep wrestling with it.
- The band has visibly stretched and no longer holds firm on the tightest hook.
- The underwire sits on tissue rather than in the fold, even after repositioning.
- Overflow persists after correct scoop-and-swoop and a full movement test.
Alterations can fix some things, like shortening straps or moving hook positions, but they can’t rebuild a stretched underwire frame or reshape a seam that’s cutting across tissue. A professional fitting is worth booking if you’ve tried multiple sizes with no improvement. A good fitter will check band, cup, wire seat, and gore placement in a single sitting, and can point you toward constructions you may not have considered.
Why trust Lingerie Seduction on bra fit?
The bra range is curated with fit as the starting point, not an afterthought, covering everyday shapes through to statement pieces without sacrificing coverage where it matters. Styles are selected with attention to cup depth, wire width, and band construction, the exact variables that determine whether quad boob happens in the first place.
If you’re working through sizing issues, the guide to common lingerie sizing mistakes covers errors beyond quad boob that are worth ruling out. Orders over a certain amount ship free, and returns are hassle-free if a size doesn’t work once it arrives, so testing a new style or sister size carries little risk.
How do you adjust bra straps without making spillage worse?
Straps are the most commonly misused fix in bra fitting. Most women reach for the strap adjusters the moment they see overflow, but that instinct usually makes quad boob worse, not better.
Straps are meant to hold the cup in position and provide a small amount of lift. They are not designed to bear the full weight of your breast tissue or compress it into a smaller space. When you overtighten straps to try to “lift” overflow back into the cup, you actually pull the entire cup frame upward and inward, which distorts the shape of the cup and pushes tissue against the wire edge even harder.
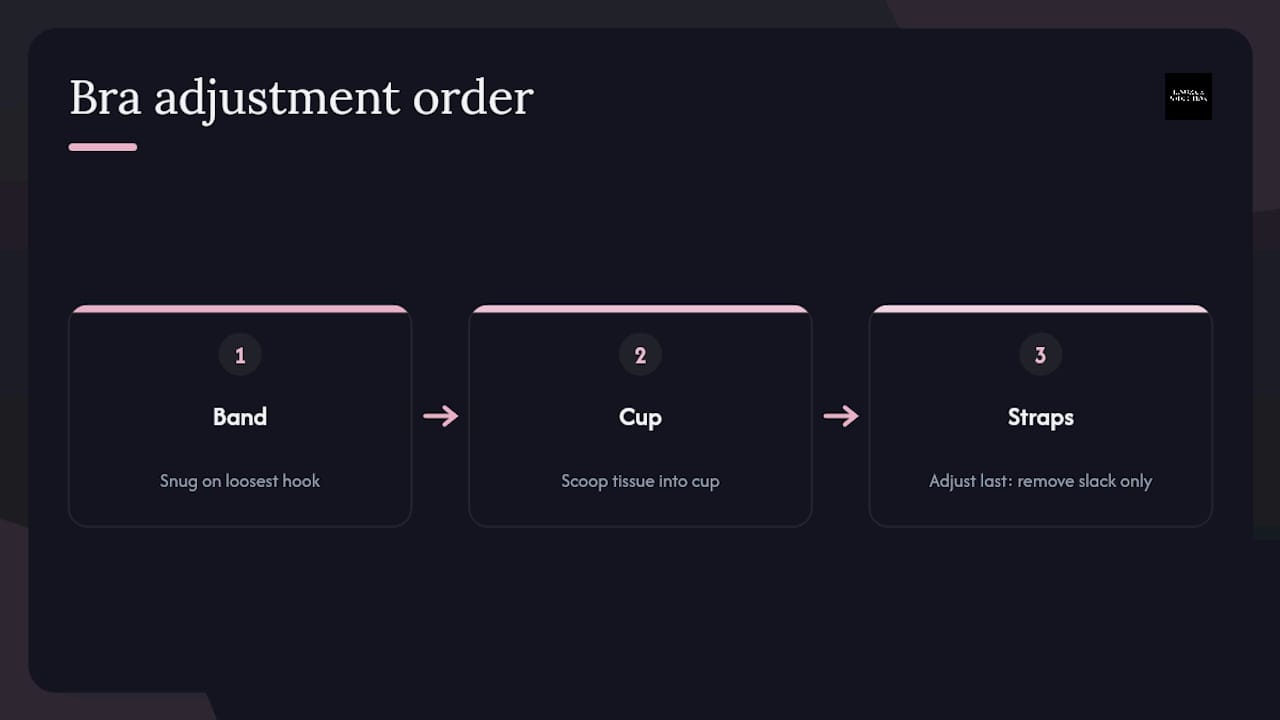
The correct order is band first, then cup, and then straps last. Once the band is snug on the loosest hook and tissue is properly scooped into a cup that actually fits, adjust straps only enough to remove slack, not to create lift or hold volume. A properly fitted bra should feel like it’s doing most of the work through the band, the majority of support should come from the band, with straps doing comfort adjustments only.
If you find yourself tightening straps every few hours just to stop overflow, that’s a sign the cup size or shape is wrong, not that your straps need more tension. Going back to the cup size and style choice will solve the problem far more reliably than any strap adjustment ever will.
Can bra inserts or padding help minimise the look of quad boob?
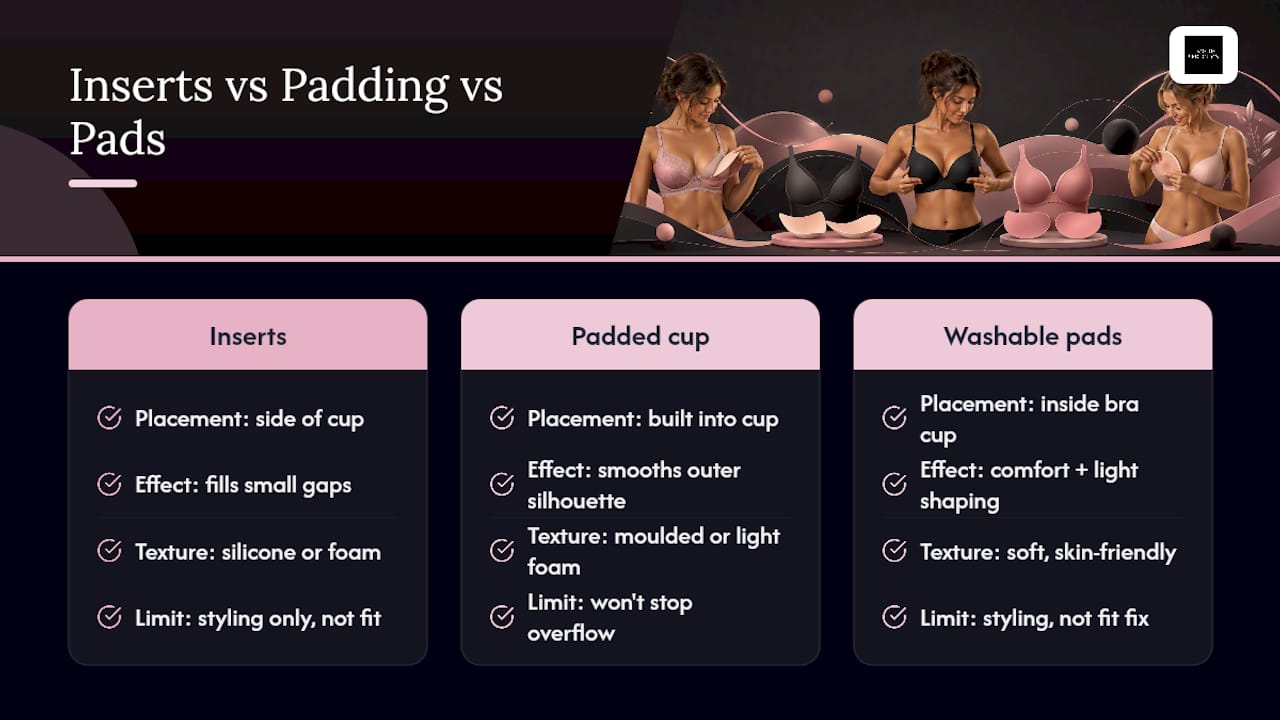
Inserts and padding won’t fix a fit problem at the source, but they can smooth the visual line of a bra while you’re testing sizes or waiting on a new purchase. Silicone or foam inserts placed at the side of the cup fill small gaps where a cup is slightly too big in one area, which can reduce the stepped appearance where tissue meets fabric.
Padding works differently. A lightly padded or moulded cup, used in the correct size, can create a smoother outer silhouette by giving tissue a consistent surface to sit against, rather than the soft fabric of an unlined cup, which can show more texture and shape variation underclothing. This is a styling choice, not a fit fix. If the underlying band or cup size is wrong, padding will not stop overflow, it will just change how visible it is under certain fabrics.
Washable breast pads are another option worth knowing about, particularly for readers who also want comfort and shaping support day to day. A guide to washable breast pads for sensitive skin is a useful reference if you’re looking at padding options beyond what’s built into a bra cup. Treat inserts and padding as a finishing touch after fit is sorted, not a substitute for it.
What clothing choices help hide quad boob while you sort your bra?
Certain tops and layering choices make quad boob far less noticeable, even before you’ve settled on the right bra. Fabric structure matters more than most people expect here.
Structured fabrics with some stretch, think ponte knit, scuba fabric, or firmer cotton blends, skim over minor overflow far better than thin, clingy jersey, which shows every line and edge underneath. A structured fabric doesn’t cling to the exact shape of the overflow, so the eye reads a smoother silhouette overall.
Necklines matter just as much as fabric. A higher crew neck or a wrap-style top draws the eye toward the collarbone rather than the bust line, while very low or tight scoop necks tend to frame exactly the area you’re trying to smooth. Layering a soft cardigan or blazer over a fitted top adds another layer of structure without adding bulk.
Patterns help too. Small, busy prints break up the visual line far more effectively than a solid block colour in a tight fit, which highlights every contour. None of this replaces a correctly fitted bra, but a good top can buy you comfort and confidence on days when you haven’t had a chance to resize yet.
What the fitting industry gets wrong about quad boob
Most advice online treats quad boob as a body problem to manage rather than a fit problem to solve, and that framing does readers a disservice. Women get told to buy shapewear, avoid certain tops, or simply accept it as part of having a fuller bust. The evidence points somewhere else entirely: change the bra, and the visual problem usually disappears.
The other conventional wisdom worth pushing back on is the instinct to tighten straps the moment overflow appears. It’s the first thing most women try, and it’s consistently the wrong move, since it distorts the cup frame rather than fixing the cause. Cup size and shape do the real work; straps are a finishing adjustment, not a structural one.
What we’d prioritise first, above new bras, above shapewear, above clothing tricks, is the scoop-and-swoop and one-cup-up test. It costs nothing, takes two minutes, and rules out the single most common cause before you spend a cent. Everything else in this guide is a second step, useful, but secondary to getting that first check right.
— Lingerie Seduction
Bra options worth trying once your fit is sorted
Once you’ve worked through sizing and confirmed your correct band and cup combination, the right style makes all the difference to how smooth and supported you feel. The Luxe Black Lace Cami Lingerie Set is built with structured support that sits smoothly against the body, a solid option if you’re after cleaner lines under fitted tops without sacrificing the lace detailing that makes it feel special.

For readers who found their overflow sitting high near the strap, the Luxury Nude & Black Babydoll Lingerie Set offers a higher neckline and soft shaping that works with fuller busts rather than against them. Both pieces come in a size range built around the fit checks covered above, so run through the two-finger rule and wire seat check before you order.
If the size you choose doesn’t sit right once it arrives, the returns process is hassle-free, and orders over a certain amount ship free, so there’s no risk in trying a sister size or the next cup up to see what actually works for your shape.
Sources
For deeper detail beyond this guide, the bra-calculator.com explainer on quad boob covers cup shape, band pressure, and sister sizing in more technical detail. Flinders University’s piece on exercise and breast size is worth reading if you’re wondering whether training can change tissue volume. For style options once your size is confirmed, browse types of bra to compare constructions side by side.
- Double Bust (‘Quad Boob’) in Bras? How to Fix It
FAQ
Why are my breasts bulging over my bra?
Bulging almost always means the cup is too small, too shallow, or the neckline sits below where your tissue starts. Going up one cup size while keeping the same band resolves most cases.
Can exercise fix quad boob or make breasts firmer?
Exercise strengthens the pectoral muscles under the breast but does not remove or reduce breast tissue volume, so it won’t fix a cup-size problem on its own.
How can I lift my breasts without relying on a bra?
Posture and pectoral strength can create a slight visual lift, but genuine support comes from correct band tension and cup shape. A well-fitted bra with side support, like a balconette style, does more for lift than any exercise alone.
Why does my bra gap at the top of the cup?
Gaping usually means the cup is too large for that specific shape, even if the band and volume feel right, and it often points to a style mismatch rather than a sizing error. Trying a different cup shape, such as a seamed or balconette style from Lingerie Seduction’s bra styles guide, often solves gaping without changing your measured size.
How do I know if I need a completely different bra size?
If overflow persists after scooping tissue in, trying one cup size up, and testing a sister size, it’s time to book a professional fitting rather than keep guessing at home.


